Lumbar Puncture
Peri-Procedural Management of Coagulopathy, Thrombocytopenia, & Antithrombotic Agents (last updated 01/2021)
Indications
Urgent: Suspected CNS infection
Urgent: Suspected SAH in patient with negative CT scan
Non-urgent: Diagnosis of suspected pseudotumor cerebri, NPH, CNS symphilis, CNS vasculitis, carcinomatous meningitis, TB meningitis, cancer staging
Therapeutic LP (such as in pseudotumor cerebri)
Therapeutic: Spinal anesthesia, intrathecal chemo, intrathecal antibiotics
Contraindications
Thrombocytopenia (platelets <50,000)
Elevated ICP (signs include papilledema, decreased consciousness, focal deficits), consider CT prior to LP to rule out mass effect
Skin infection overlying area where LP is to be performed
Prior low back surgery – may require fluoro-guided procedure by IR
Supplies
Anatomic Considerations
The subarachnoid space must be entered below the termination of the spinal cord. The spinal cord terminates around the L2 body.
Identify the vertebral spinous processs in the midline. Draw an imaginary (or real) line connecting the superior iliac crests. These lines intersect at the L4 spinous process, or the L3/L4 interspace. You can select any interspace from L2-L3 to L5-S1 to perform the LP, but L3/L4 and L4/L5 are most commonly used.
You may want to mark your intended interspace with an indentation or the hub of a needle prior to beginning, so you don’t wash off your markings.
Technique
Informed consent
Obtain patient’s informed consent and have consent available in chart; perform a “time-out” to confirm that this procedure will be performed on the correct site, on the correct patient.
Every procedure, every time. Documentation is paramount particularly when considering performing a procedure. Every therapeutic procedure, despite the best intent, carries with it inherent risks along with the potential benefits. As healthcare providers it is our duty to adequately educate our patients regarding these risks and benefits, providing information and answering questions in lay terms so that the patient (or their surrogate) can make an informed medical decision.
“Informed consent” comprises several different aspects which should be documented in the chart prior to performing any procedure:
1. Name of the procedure and the diagnosis for which it is being performed.
2. Risks of the procedure and their likelihood of occurring (see above)
3. Benefits of the procedure as well as likelihood of information/advantages gained.
4. Alternative therapies if available, as well as their risks and benefits.
5. Opportunity for the patient (or surrogate) to ask questions and discuss other options.
6. Documentation of the patient’s (or surrogate’s) ability to provide adequate informed consent.
Many institutions have “Informed Consent” templates available which help providers review and document each of these important aspects. Make sure these consents are signed and available in the chart prior to any procedure.
Dire situations may arise where a patient is unable to provide informed consent and a surrogate is unavailable; if the patient requires a potentially life-saving procedure emergently and may die without it, the procedure may be performed without informed consent. Once the acute emergency has been dealt with, informed consent from the patient or a designated surrogate should be obtained retroactively as soon as possible.
Patient and equipment preparation
Arrange patient in appropriate position for lumbar puncture
The most common position entails that the patient be in a lateral recumbent position with both the knees and head flexed. Placing a pillow under the head and between the knees can help keep the patient comfortable and the spine in one plane. If ICP measurement is required, it must be done in this position.
LP can also be performed with the patient sitting on the bed leaning onto a tray table with their back rounded. ICP cannot be measured in this position.
Often it is helpful to have an assistant help position/hold patient in place during the procedure to keep the spine aligned in one plane.
Landmarks
Identify your landmarks; palpate the superior iliac crests and “draw” a mental line between these points (this will be at about the L3/L4 interspace).
Since the cord usually ends around L1/L2, entering below this site (L3/L4, L4/L5, L5/S1) reduces risk of spinal cord injury. Mark the planned entry site with a pen prior to sterilizing the area.
Pain Management / Local Anesthesia
Local anetsthetic: As below, using 1% lidocaine without epinephrine, infiltrate the the skin and intervertebral space using a 20 or 22 gauge needle.
Post-LP Headache prevention: Headache occurs in 10-30% of patients. Studies have shown that using smaller bore needles, and orienting the needle bevel parallel to longitudinal fibers of the dura will decrease the incidence of post-LP headache. Positioning of the patient prone vs supine after the procedure have not been shown to change the incidence of post-LP headache. Bedrest does not significantly decrease the risk of post-LP headache.
Sterile Technique
Wash hands with soap and water prior to beginning the procedure
While wearing non-sterile gloves, clean the overlying skin with chloraprep, starting at your point of entry and moving in concentric circles outward. Sterilize a wide area. Repeat 2-3 times. The antiseptic should be allowed to dry completely before the procedure begins.
Use barrier precautions including:
Surgical cap
Face shield or goggles
Sterile gloves
Sterile gown
Drape the patient with the sterile drape (with opening over lumbar spine). This is included in your LP kit. Consider using additional sterile towels to expand your sterile workspace.
Ensure any assistants follow proper aseptic technique
Catheter insertion
With the stylet in place, insert needle where mark was made. Make sure the beveled edge is facing upward (parallel to the long axis of the spine, which helps separate the longitudinal dural fibers with less trauma).
Advance needle slowly aiming slightly towards the head (in infants)/navel (in adults), and when you feel a “pop” (the sensation when the needle pierces through the dura) withdraw the stylet watching for fluid (usually about 1.5 to 2 inch insertion).
You may not feel a “pop” in all cases. If no fluid is visible in the needle hub, rotate the needle slightly. Otherwise, reinsert the stylet and advance slightly.
Continue this series of steps until fluid is visible or you feel you’ve gone too far. If you’ve gone too far, put the stylet back in and withdraw the needle. Start again with a spare LP needle.
If you feel that the needle has hit bone, pull the needle back a few centimeters to redirect and advance again. In elderly patients with degenerative joint or disc disease, oftentimes the interspaces are quite small. Be aware of this before proceeding; if unable to obtain fluid consider a CT/fluoroscopy-guided procedure by Interventional Radiology.
If you are checking opening pressure make sure the manometer is set up and within reach. When you first see fluid in the needle hub, immediately attach the manometer to the end of the needle. Let fluid enter the manometer tube until it reaches a steady level and record that number (the level will rise and fall slightly with respiration).
To collect the fluid after using the manometer, simply twist the 3-way stopcock off to the patient and open to the side port. Collect 2-4 cc of fluid out of the manometer tube via the 3-way stopcock into each of 4 LP collection tubes
To collect the fluid without using the manometer, hold a collection tube just under the needle and let 2-4 cc of fluid drip into the tube. Repeat for a total of 4 tubes. If a number of studies are needed, up to 40cc of fluid can be removed at one time.
Once all fluid is collected, replace the stylet making sure the bevel is facing upward (parallel to the long axis of the spine) and withdraw the needle.
Post procedure considerations
Carefully discard sharps and place a band-aid over the site.
Promptly enter your procedure note
Specimen Handling
Typical studies obtained for a diagnostic lumbar puncture include:
Tube #1: Cell count and differential
Tube #2: Gram stain and culture
Tube #3: Protein and glucose
Tube #4: Hold for further studies
It is imperative that a tube be saved for studies to be ordered later, especially if the clinical picture or differential diagnosis changes. Studies that are often obtained after the initial procedure include: Cryptococcal antigen, bands, HSV, VDRL, cytology, etc. If you are concerned about a possible subarachnoid hemorrhage, obtain cell counts on both Tube #1 and Tube #4; if a hemorrhage is not present the RBC counts should decrease significantly from Tube #1 to Tube #4.
Results interpretation
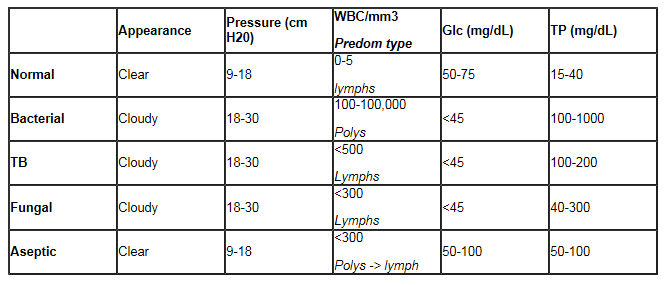
Typical CSF Findings in Meningitis (Table adapted from Pocket Medicine, Fourth Edition):
Recognizing & managing complications
Spinal headache
Usually occurs because of slightly reduced ICP following lumbar puncture. Headache is typically mild and resolves spontaneously after 24 hours.
See Pain Mgmt section below regarding prevention of post-LP headache
Conservative treatment with bedrest and oral analgesics for the first 24 hours is recommended.
Caffeine has been used as a treatment for spinal headache but the efficacy is questionable.
Spinal headaches are usually self-limited; treat with appropriate pain control as indicated.
Nerve root trauma
Seen more often in patients with pre-existing scar tissue or previous spinal surgeries.
Treat with appropriate pain control as indicated.
Subdural/subarachnoid bleed and hematoma
Seen more often in patients with an underlying coagulopathy; treatment depends on the complication.
Check CBC and coagulation studies prior to performing the procedure; correct abnormalities as indicated.
Meningitis (introduced)
Observe proper aseptic technique to reduce contamination risk.
Herniation
If there is any suspicion for increased intracranial pressure (focal neurologic signs, papilledema, etc.), obtain a Head CT prior to attempting the LP.
References
UpToDate: Lumbar puncture: Technique; indications; contraindications; and complications in adults
UpToDate: Post-lumbar puncture headache
Roberts: Clinical Procedures in Emergency Medicine, 5th ed.- 2009 – Saunders
Introduction to Inpatient Procedures: A Resident-to-Resident Guide.University of Minnesota Internal Medicine Residency AHCC Ambulatory Rotation. Second Edition, Revised October 2007 (available via www.mededportal.org)
Sabatine, Marc.Pocket Medicine, Fourth Edition. Lippincott Williams & Wilkins, 2011, Philadelphia PA. Page 6-10.